Properties
Overview
Properties are the backbone of a searchable and intelligent Workspace. They act as structured metadata – attributes used to add specific context, classification and depth to your Nodes.
By assigning Properties to your Nodes, you transform a simple list of files into a queryable, intelligent database.
They allow your teams and AI agents to classify, organise and distinguish between thousands of items to find precise information in seconds – whether you're filtering contracts by "Termination Date" or identifying technical manuals by a specific "Author".
The Two Core Types of Properties
myReach categorises properties into two distinct groups (with a bonus stand-alone Property), to balance automation (Default Properties) with user-defined customisation (Custom Properties):
1. DEFAULT Properties
These are standard attributes that appear automatically on Nodes when the relevant metadata is available. There are two types of Default Properties:
-
Blocked Properties: Fixed values that cannot be edited, such as Creation Date, Last Modified, or AI Status. While they cannot be deleted, they can be hidden from a Node's view by right-clicking the Property and selecting "Hide Property".
-
Smart Properties: Automatically generated attributes that remain editable and can be deleted, such as Reading Time or Language.
2. CUSTOM Properties
These are user-defined attributes that are editable and tailored to your specific needs. When you create a Custom Property, you define the Type (e.g., Checkbox, Date, Number) and the Name. You can also choose whether to add it automatically (AI-Populated) for any new Nodes you save to myReach.
-
Examples: A "Cost" property (type: Number), a "Project Phase" property (type: Select), or a "Deadline" property (type: Date).
-
Creation: You can create a Custom Property from "Settings > Properties > Create New Property" or directly from the Node, by clicking on "Add Property" within the Node's Properties Tab and selecting "Create New Property". Here is a step-by-step guide:
Steps to create a custom property:
-
Click on a Node to open it.
-
Go to the "Properties" section.
-
Click on "ADD property".
-
Click on "Create New Property" and select the type of property you want to create
-
Fill in the necessary details.
Alternatively, choose any Property type from the list of pre-existing Properties and fill in the necessary details to add it.
Deleting user-created properties: To delete a Property, go to Profile > Settings > Properties > Select the Properties you want to delete and Click on "Permanently Delete Property".
-
3. Bonus Property: VERIFIED
The Verified property is a stand-alone attribute, similar to the "Verified" of X or Instagram accounts, where a blue tick appears next to the Node to confirm that it's "Verified".
-
Function: Flagging a Node as "Verified" adds a blue checkmark next to the title and within the source cards of the answers of the AI Assistant and the Genies.
-
Why it matters: In a large organisation, this allows administrators to highlight "official" or "gold-standard" versions of documents (such as the latest HR policy or a signed contract), ensuring users know that a certain file has approved and verified information, over drafts or outdated files.
Key Benefits
-
Search and Filtering: Move beyond keyword searches and quickly find specific information, such as identifying all invoices with a "Status" of Pending or finding contracts that end this year and have a "Revenue" between 50k and 100k.
-
Enhanced Organisation: Properties allow you to sort, filter and search for nodes based on specific property values. This makes it easier to locate and manage your information.
-
Customisation: You can create custom properties to suit your unique data management requirements. This flexibility allows you to adapt myReach to your workflow and preferences.
-
Personalisation: By using Properties, you can personalise the way you organise and retrieve your data. This customisation ensures that myReach aligns with your information management style.
Advanced Property Features
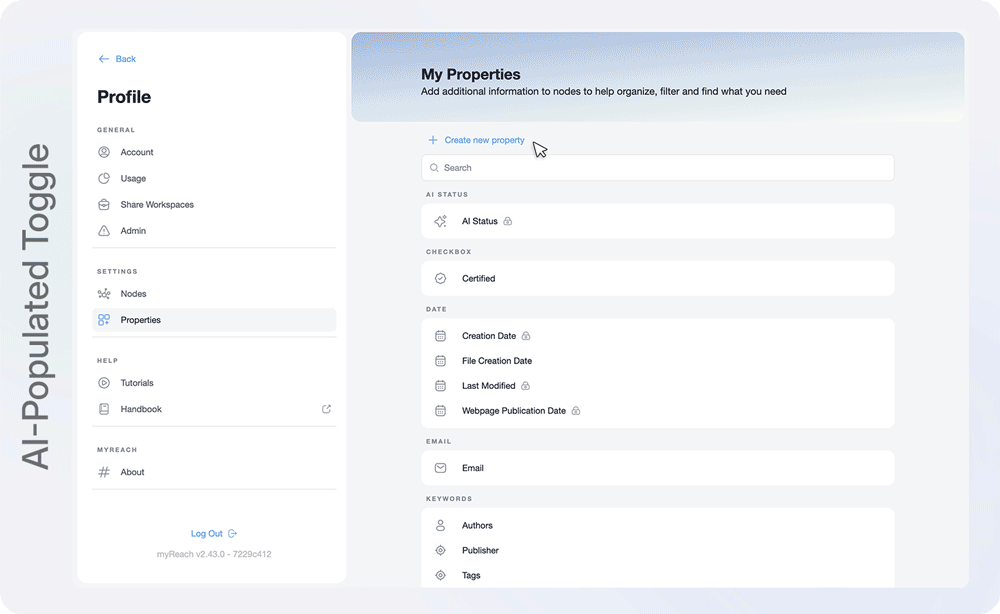
🤖 AI-Populated Properties
Automate your data entry and eliminate manual typing, by enabling the AI-Populated Toggle when you create a Property in Settings > Properties. By doing so, every time you add a new Node that fits the requirements of the AI-Populated Property you've created, it will automatically add it to the Node and fill in the input field.
-
How it works: The AI scans the Node's content to extract relevant information automatically (e.g., pulling a specific "Effective Date" from a scanned PDF contract, or finding an "Email" address within a 50-page PDF). Once it identifies and extracts this information, the Property field is populated automatically.
-
Benefit: Ensures your database remains comprehensive and up-to-date without manual data entry.
🔄 Merge Properties
To prevent your knowledge base from becoming cluttered with Properties that are duplicate or very similar, you can use the Merge feature to clean up the options.
-
How it works: Combine duplicate or similar properties (e.g., merging "Price" and "Cost") into one Primary Property.
-
Benefit: It unifies the data to ensure that when you or a colleague filter the data for a specific Property, you receive a complete, unified list of results regardless of how the original data was labelled.
📈 Advanced Numerical Filtering
For total precision, you can specify unit measurements and ranges within your filters.
-
Size & Scale: Filter for files larger than 100MB.
-
Specific Ranges: Find suppliers with a commission between 10% and 20%.
-
Financial Thresholds: Identify contracts with a value greater than £50,000.
Different types of Properties
MyReach offers various property types to suit different needs:
Checkbox: A binary toggle used for simple "Yes/No" or "Complete/Incomplete" tracking, perfect for marking tasks as finished or contracts as signed.
Date: Date Properties store specific milestones like birthdays, deadlines or renewal dates.
Email: A dedicated field for storing one or multiple contact email addresses for clients, vendors or internal team members.
Location: Provides geographical context by allowing you to search for addresses or specific locations.
Number: Use this property type for numerical values, such as quantities, units, monetary value (e.g. distinguishing currencies $, €...), measurements (e.g. distances in km, miles...), percentage (e.g. indicating success probability or % comission rates) and more.
Phone: This property allows you to add multiple phone numbers, such as work, personal, or mobile numbers.
Select: This property type is suitable for items where one or multiple values can be chosen from a list (e.g. importance or rating (select from a 0 to 10 list) to prioritise tasks and rank files)
Text: A flexible field for adding descriptive notes, keywords or specific snippets of information that don't fit into other structured categories.
Time: Represents hours and durations, which is useful for tracking the length of recorded meetings, reading time of articles, or other time-related values.
URL: Stores direct links to external websites, dashboards, or online references without saving them as independent Nodes in your Knowledge Base.
Each property type serves a specific purpose, from marking completed tasks to specifying monetary values or durations.
Property Management & Settings
Global Control
You can manage all your properties at a global level via Profile > Settings > Properties.
-
Editing: Changes made here apply to every instance of that Property across your Workspace.
-
Deleting: ❗ Use Caution. Deleting a property type here will permanently remove it and all its associated data from every Node in your Knowledge Base.
Filtering and Organisation
The "+" icon in a Node’s Properties tab allows you to toggle between:
-
In Use: Properties currently active in the specific Workspace.
-
All: Every property defined within your entire Knowledge Base, allowing you to reuse existing attributes from other projects (Workspaces).
Breakdown of Key Properties
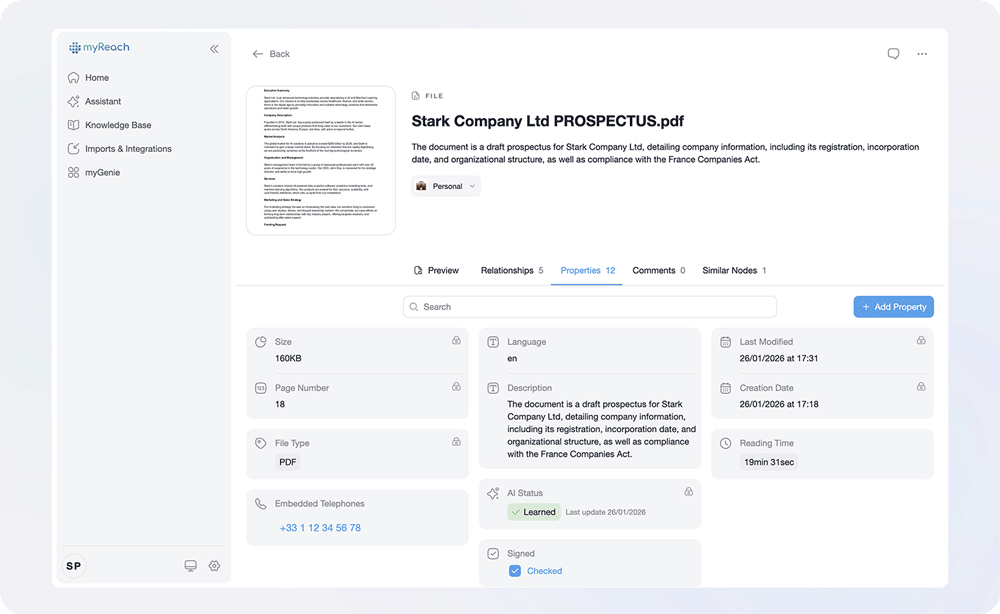
AI status: When a node is created, myReach's AI learns the content of the node and sets the status as "Learned", "Not Learned", "Failed to Learn" or "Unprocessable". It's importnat that the AI Status is "Learned" for the AI to be able to use the content in the answers.
Description: This refers to an automatically generated brief description or synopsis of the content when you save a file, website, or note.
This AI-generated description serves two main purposes:
-
Content Understanding: It provides a quick overview of the node's content in a few sentences, aiding in understanding the information without delving into the entire document or webpage.
-
Efficient Search: The summary facilitates easier searching for nodes, allowing you to quickly identify and access relevant information.
Filtering by Properties
Properties allow for efficient filtering and categorisation of nodes. You can filter nodes by their Properties to quickly find specific information or tasks.